How do I port my number ?
Please contact us before submitting a port request.
If we have already discussed this with you then continue below.
If you were told to download an LOA form click here.
Please contact us before submitting a port request.
If we have already discussed this with you then continue below.
If you were told to download an LOA form click here.
To setup recurring Payments. Download this form and submit it to us via email or fax.
| Key | Action |
|---|---|
| 1 | Play New Messages |
| 2 | Change Folder to Saved Messasge |
| 5 | Change Settings |
| Key | Action |
|---|---|
| 1 | Save Message |
| 2 | Replay Current Messasge |
| 3 | Forward Message to another Mailbox |
| 4 | Skip to Previous Message |
| 6 | Skip to Next Message |
| 7 | Delete Message |
| 9 | Return Call |
| 0 | Main Menu |
Spam can be filtered by us at the server - this is called server side filtering, and / or it can be filtered by the end user (you) this is called client side filtering.
As a service provider we try to stay neutral in concerns of how our service is used, however there are some exceptions and spam is one.
While unsolicited email will very likely always be around sometimes it is abused. In order to curb this abuse our mail server tries to identify spam emails for you.
We use a commonly used software called Spamassassin to do this. Spamassassin give each email message a score.
Messages that are above a specified score are moved to the "Junk" folder, this give you a chance to check and see if an expected email was accidentally classified and spam. Mail left in the Junk mail folder is automatically deleted after about 10 days.
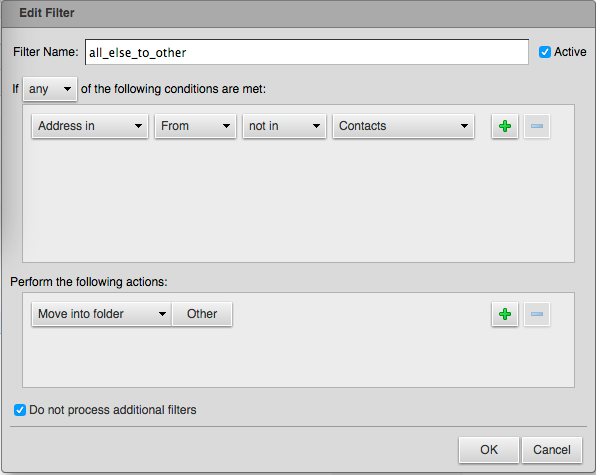
All other mail is placed in your "Inbox". Because we offer a collaborative mail server solution there are some options in the web-mail interface you may wish to use.
Useful server side filtering rules
To add server side message filtering rules :
Then you will want to create an "Incoming Message Filter"
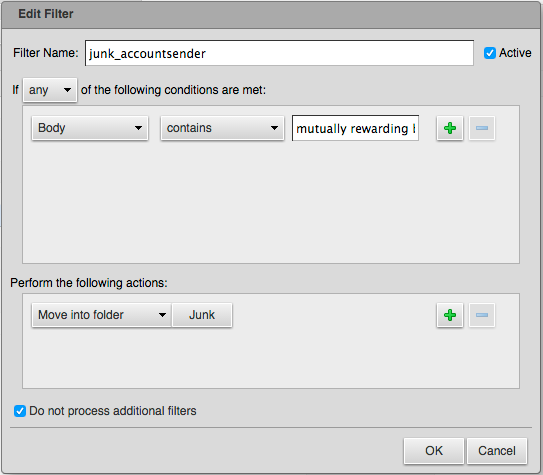
you must be careful creating custom rules, while the example rule is useful on a personal email account it may trigger false positives on a business email account.
If you wish to use this rule you need to :
When an email is scored, headers with the results of that scoring are added to the envelope. Headers describe the subject of an email, who it is from and to, where the email came from, when it was sent and when it arrived, and lots of other things. If you view the headers of a scored email you will see some X-Spam headers:
This header contains a few things, the most interesting is the calculated score in numerical form and the list of tests that matched for this email. While this header is educational and useful for understanding the system and why decisions were made, it is not very useful for automated filtering.
This is the numerical spam score only, without the extra info shown in the X-Spam-Status
This header contains either a YES or NO. If the spam score is above a system wide set threshold then this flag will be set to YES. Messages that have a YES here will be moved to the Junk mail folder by the server.
If the email's spam score is a score of 1 or more, this header will be added. This header shows the score as a series of asterisks kind of like a bar on a bar graph. For example if the calculated score is 4.7 this header will look like: X-Spam-Level: **** where the number of asterisks is the score rounded down a whole number. What this header lacks in detail, it makes up in utility when it comes to writing filter rules in your mail client.
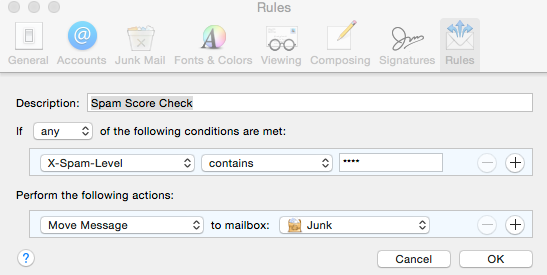
Now the fun part: creating a rule in your mail client to help you manage spam. There are lots of ways to do this and each mail client does it slightly differently. In this section I will give generic directions that describe what you should be thinking when you create a rule.
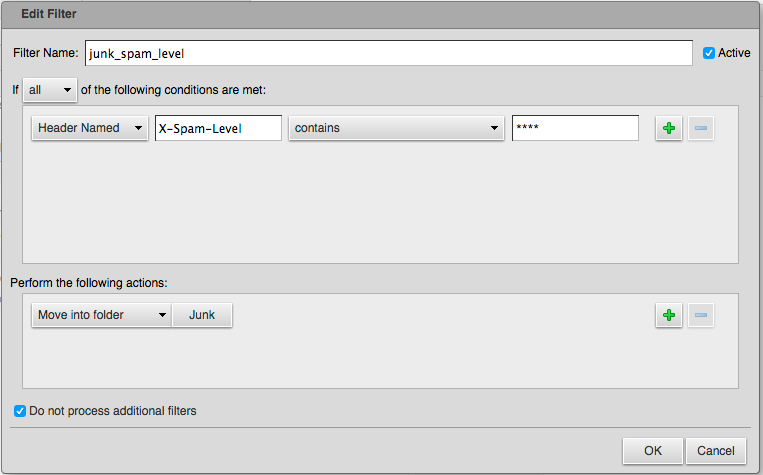
You need to create a filter which will check whether messages are likely to be spam. This filter will work by checking for information added to the message headers by the SpamAssassin service. Specifically you will be checking the value of the X-Spam-Level header. Keep in mind that by using these rules you increase the chance that legitimate mail may be caught by your filter.
If you are having trouble sending email then make sure you are using SMTP authentication.
Calendars & reminders (CalDAV) for newer systems try this first.
On macOS Calendar App
Account Type : Manual
User Name : user@domain.com
Password : your-password
Server Address : mail.mb-sc.net
Calendars & reminders (CalDAV), for older systems and reference.
Account URL : https://mail.mb-sc.net/principals/users/user@domain.com/
The CID number is determined by the service provider of the calling party.
The CID name is determined by the service provider for the receiving party.
Caller ID is a widely used phone system feature that identifies an incoming caller by a name and phone number. The feature isn't perfect, and it can sometimes misrepresent a caller's identity. But for the most part, caller ID is a valuable piece of information. It's offered with just about every commercial phone provider, including landline, VoIP, and mobile phone services.
However, unlike local number portability (LNP), caller ID is not regulated by a governing body such as the Federal Communications Commission (FCC). Rather, the service is essentially a patched-together network of decentralized databases that frequently operate with outdated information.
When a call is made, the originating phone switch sends the caller's number. Then, with the caller's number, the callee's service provider is responsible for looking up the caller's subscriber name.
When it was developed, the world was primarily a realm of Plain Old Telephone Service (POTS) lines, and the caller information was tied to the Central Office switch to which the wires were connected. Since there were also relatively few carriers at the time, it was easy to keep track of the caller ID information in one place.
Today, with the prevalence of wireless and VoIP phones, hundreds of local/long distance carriers, consolidations, mergers, and the like, the map has become much more fragmented. Unlike phone numbers and domain name service (DNS), wherein there are internationally recognized databases that are authoritative sources, there is no central authority or regulation for caller ID. No FCC guidelines regulate carrier accuracy, and although federal regulations exist regarding telemarketers and spoofing, carriers can maintain their caller ID databases as they see fit.
The phone number displayed by caller ID is determined by the calling party. For a landline, the displayed number corresponds to the phone number that's registered to the line. For a PRI or SIP connection, the phone system can actually control what number gets displayed on a case-by-case basis.
The caller ID name is determined by the receiving carrier. The receiving carrier queries a CNAM database to determine the name registered to the provided phone number. VoIP services do pass a name identifier with caller ID info, but most carriers do not display that data unless it's a SIP to SIP (extension to extension) call.
CNAM (“Calling NAMe”) is an outside telecom service that phone companies use to pair incoming numbers with names. Unlike phone numbers, CNAMs are not on a centralized database. A carrier can choose from many different CNAM providers. Each CNAM provider maintains its own private database of phone number/name pairs in the United States and abroad.